Thursday, December 9, 2021

Imjin River Board - Villages, Roads and Rice Paddies galore

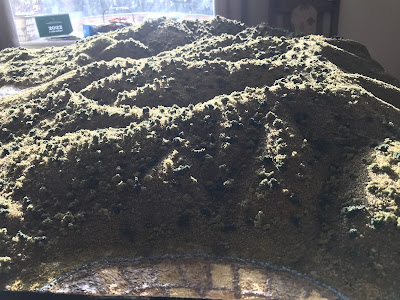
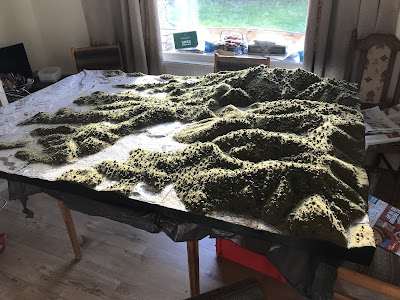
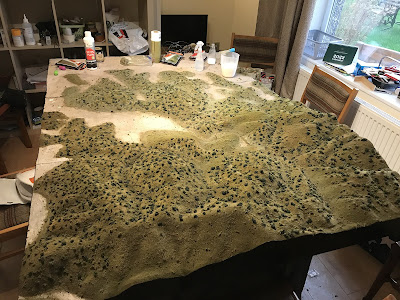
I am nearing the end of my River Imjin board build, and having completed the flocking I have moved on to adding in the villages, roads, smaller rivers and streams as well as started on the paddy fields. There is more information on the earlier phases of the build starting here.

Roads were created by brushing on a thin line of PVA and then adding a really fine sand from war world gaming. A similar process was used for the minor rivers using a dark ash sand with some larger greyer grains using N gauge railway ballast. They are really dark but I haven’t quite finished with these rivers yet as I will be highlighting them with different colours once I am closer to the finish.

The Korean houses on the battlefield were mostly traditional hanok style, single storey, with wooden frames and dirt and straw walls with straw thatch on the roof. A small number were stone with tile roofs, belonging to richer or noble Koreans. They tended to be fairly small and were clustered into a number of villages. The area had already seen fighting during the war and some buildings had already been destroyed. They also tended to be located in the valleys. Consequently the villages and buildings had little military value or role in the battle.

Regular readers of this blog will know I see buildings as terrain and so try to represent them in as close to ground scale as possible. I am building the battlefield with a ground scale of 1:4000, or 1 mm equaling 4 metres. Consequently my ability to detail buildings was limited - and given there are hundreds on the battlefield this is a good thing! So I started with match sticks, which have a roughly 2mm square profile. They were too big. So I tried cutting them lengthways to get 1mm square blocks. I could do it but it was time consuming and wasteful. So I went online and found some lengths of 1mm and 1.5mm square wood from a modelling store. Who knew that was a thing? Progress speeded up thereafter.

Firstly I painted the wood a dark brown. For the higher status buildings I painted them white. Then I used my craft knife and cut the strips roughly into 2mm long pieces. Each individual building would therefore be about 4m wide, 4 m high and 8m long. All in all not too bad.


I used AK Terrains Diarama series light earth acrylic texture as a base for my villages. Once dry the  buildings were then glued on using PVA. 

I then gave the whole village a soft tone inkwash. I used a 0.3mm permanent marker to divide the village into small holdings. 

I then painted random blocks with different greens or browns.

The tops of each village building was painted necrotic green and soft tone ink wash. The higher status buildings got a chaos red colour. I added a dash of tufts and my villages were done!

Then the hard slog began! Rice paddies, lots and lots and lots of them.

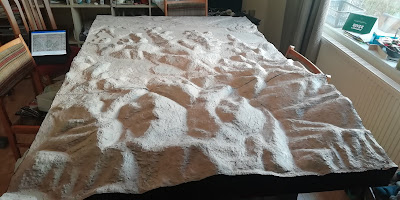
The terrain on this board generally is split between flat and steeply rising hills. Looking at a map of the area made in 1953 this shows that pretty much all the flat area was paddy fields. The paddy fields on this map were much more extensive than the ones shown on the 1951 map I used for the contours. However the 1953 map noted that most of the villages were “destroyed”. This seems counter-intuitive. Why would destroyed villages need more rice paddies? I think the answer lies in the 1951 map being based on 1940s Japanese maps. I believe that the rice paddies were developed during the mid to late 40’s and therefore most were present at the time of the battle in 1951. Thus I decided that pretty much any flat area on the board would have rice paddies on them.

The battle took place in late April and so the rice paddies at that time of year were not planted or flooded and so would have been bare and in various shades of brown. The image above shows a Google Earth image of the paddies on the Imjin during winter. This would be the basis for the colours and size of the rice paddies on the board.


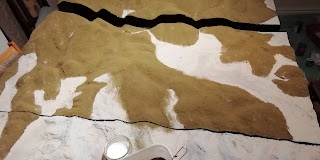
To create mine I used AK terrain’s desert sand texture as a base.

I then used monster brown paint and a range of inks to create individual paddies.

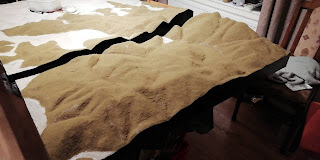
I just kept adding them, randomly placing each colour .


The final mosaic looks untidy and indistinct. However once the trusty permanent marker was used to delineate the paddy boundaries then the fields separate and sharpen and the overall appearance improves significantly.

Add in lots more rice paddies, the odd village and some slopes and it gets better.


Next time I will be making the river Imjin itself. Once that’s done I will just have some bits of tidying up to do and the board will be finished. Then I can get on with painting the troops!

Keep your dice rolling!

Charles the Modeller

Monday, November 8, 2021

Imjin River board, flocked and brush, scrub and trees added

Last week I was able to spend some time working on my Imjin River board. You can find more details on the inspiration here, the contouring here and the initial build here.
I had a week all to myself whilst the Mrs and the kids had a break away. So I took over the dining room put all three boards on the table.

I painted the edges of the boards black. I considered putting dowels in to lock the boards in place but held off as I worried about everything not quite lining up properly. The boards are heavy and don't seem to move easily so I will decide later on that. The same with side locking clasps.

I painted the hills with a mix of greyish and brownish paint. The next step was the initial layer of flock. Korea, particularly in April, is dusty and brown and that can be tricky to pull off. I started with woodlands scenics earth blend fine turf. Looking at it though, it seemed too green. So I added more woodland scenics earth to the earth blend to brown it some more. I ended up adding a lot of the earth before I was happy.


I then added burnt grass as a greener highlight, and used more earth to darken the valley floors and depressions. Then, for the wood and scrub covered hills, I highlighted with Geek Gaming Scenics light brown.


I am really pleased with the result.

To represent the bush and trees which covered so many of the hills I used a mix of coarse turf and bushes again by woodland scenics. I believe the hills were covered quite well by the canopy, but the trunks and branches were not big, or thick - certainly by European standards. I experimented with different densities of foam and discovered I wasn't happy with really numerous clumps as they obscured the hills I had worked so hard to make. So I settled with a good scatter of the coarse turf and a wider placement of the larger bushes using various different colours.


I think I got a great result that balances the colour and density to give the flavour of the terrain whilst still showing off the hilly terrain.


Next I need to create the rice paddies and put in the roads and minor rivers. Hopefully, now that the flocking is mostly done I will be able to do the rest of it over the next few months.

Keep those dice rolling!

Charles the Modeller


Friday, September 17, 2021

6mm Parachutes


Today, the 17th September, is the 77th anniversary of the start of Operation Market Garden and the gamble to capture and hold a bridge across the Rhine at Arnhem. The US 82nd and 101st airborne divisions as well as the British 6th Airborne Division and a Polish brigade landed by parachute and glider. So with that in mind I thought I would run through how to make some parachutes for a 6mm tabletop.

Once again I have Roland Grime to thank for this. He suggested I come up with parachutes when I was planning the 2nd lift game. He and I batted some ideas about and without him this would not have been possible.

To start with I got hold of some 10mm diameter polystyrene balls. Check the product out before you buy as you want them to be smooth with no air gaps and for them not to be made from smaller polystyrene pieces glued together. The ones I got very helpfully had a seam running round them which made cutting with an exacto knife pretty straightforward, although you should anticipate some failures at this stage.


To aid the process I laid out a line of up turned drawing pins and gently pushed the hemispheres onto the spikes. I then liberally coated them with PVA. This coat once dry hardens the shell of the parachute.

The next step is to take a blunt knife or other implement and gently scribe lines down the sides of the parachute from near the middle. The PVA prevents the scribe from tearing the polystyrene and these lines simulate the panels stitched in the parachute fabric. Once you have scribed all around the parachute take a retractable ball point pen. Gently press the retracted tip into the centre of the chute and then push the pen in. This creates a hole in the centre and an outer ring. It also helps flatten the chute and makes a more realistic inflated shape.


The chute is now ready to be painted. Dependent on the drop and era the chutes will be different colours. I found a pale bone and necrotic green worked well with a soft tone ink wash. I then added a small number of white, blue, red and green chutes representing the chutes on canisters. Each colour denoted a particular type of content in the canister and this changed by drop in WW2. I found just using the appropriate ink was sufficient.


To base them for the game I used 30mm square MDF bases and clear fishing line. I drew a diagonal line across the square and drilled small holes about 1cm apart. I cut the fishing line at set lengths each about 1cm taller than the first. One end of each line was carefully inserted into the polystyrene of the underside of the chute and the other end glued into a hole in the MDF. The fishing line has a natural curve and by placing them in ascending height turned with the bend in the same direction you can achieve a curve that looks (to me anyway) like a stick of paras has just left the aircraft.


And there you are. In no time at all you can cover your table with parachutes.


Keep those dice rolling!

Charles the Modeller

Tuesday, August 24, 2021

The Battle for Arnhem Bridge AAR video


About a week ago I spent a brilliant two days gaming with Dan Hodgson and David Wasilewski in Dan Hodgson’s fantastic and very impressive War Room. We filmed a playtest of a scenario I had written around the Battle for Arnhem Bridge. I have edited the footage for the 8 turns comprising the events of the 17th September 1944 and posted it onto YouTube.

I was hoping to attend a 3 day gaming and historical tour at Arnhem in September but unfortunately this has been postponed due to the various COVID travel restrictions. This was one of the games I was hoping to run and so this was a dress rehearsal.

The game played well but it soon became clear I hadn’t provided the British player with sufficient troops. I have made some other minor tweaks and hopefully next year I’ll be able to take another crack at it with some Arnhem enthusiasts.

Keep the dice rolling!

Charles the Modeller

Thursday, July 1, 2021

The Virtual Joy of Six


This Sunday was going to be the Joy of Six, the annual 6mm focussed wargames show held every year in Sheffield by Peter Berry of Baccus miniatures. Unfortunately it succumbed to COVID restrictions and like many other shows had to be cancelled. However Peter is running a virtual event this Sunday and I have been lucky enough to be offered a spot. Head over to www.baccus6mm.com for more information and joining instructions.

I will be showcasing my Arnhem and BrĂ©court Manor boards and might even discuss my plans for the Korean board as well. I have created a short video to help promote the event which you can find on YouTube 

I hope to chat to as many people as possible so please drop in if you are around.

Keep rolling those dice

Charles the Modeller

Battle of Scarif - adding all the bushes and trees

In previous posts I’ve covered the building of the boards, the seas, the islands and the transit systems for my battle of Scarif board. In t...